List Box Simulated...
List boxes have a tremendous amount of functionality, however, there's not much you can do with the formatting without using the ActiveX (that I frown upon) and even then there are limits. To combat that problem I use a Continuous Form and just make it look like a List Box. You can download the examples below here.
The nice thing about doing it this way is no code is required to get this to work and I can add a check box (and\or combo box) that a End User can interact with. (The only that is there is to put (Discontinued) once the check box is set to yes and it will remove (Discontinued) if No is selected.)
The difficult I do immediately, the impossible takes a little bit longer.

Controls
| Tips (Main) |
| Home |
| Add Image and Text to Toggle Buttons |
| Option Groups |
List Box (Plain)
List Box (Discontinued)
List Box (Highlight)
Create your Subform making it a Continuous Form and expose the Form Header but set Visible to No. For the Highlighting part see Highlight Current Record. Once you have completed that all the Controls in the Detail section must be set...
For Plain and Highlight
Enabled = No
Locked = Yes
Tab Stop = No
For Discontinued
Enabled = No
Locked = Yes
Tab Stop = No
Exception - Any controls, i.e. Check Box, that you want your End User to interact with leave Enabled at Yes and Locked as No.
Now, add a Text Box to the Detail section and name it txtFocus (you can name yours what you want but I like to name my controls with names that are meaningful). This control should be no taller than the Detail section and the Width is 0". Place to the utmost left of the Detail section and make sure Tab Stop is set to Yes. This is what enables the up an down motion and why all the other Controls have their Tab Stop set to No.
Note, if you want to include a Count of Records you will need to add a Text Box in the Form Header and place =Count(*) as the Control Source.
While I have the Simulated List Box sitting on a Main Form it is only there for display purposes. The Subform is the only Control you need to place on your Main Form(s).
You are done! Samples below can be downloaded here.
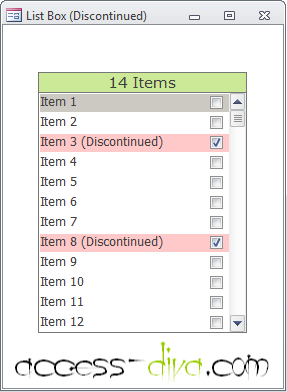


When stacking Controls, i.e. txtHighlight and txtDiscontinued, make sure to Arrange > Send to the Back in the proper order to get the one you want to always be on top. In List Box (Discontinued) the grey bar will always be on top of the red bar.


When choosing a color for txtHighlight or txtDiscontinued use the Font color not the Background color for highlighting.
And just in case you didn't know, you can change the Color of TEXT in a Control or Field using the Format property. For more on that click here.
